
README.md 30 KB
移动组件
碰撞查询
https://zhuanlan.zhihu.com/p/685714685
https://news.16p.com/842025.html
角色移动是一个复杂的计算过程,为了让游戏操作更加顺畅,往往需要非常多的细节处理,这些特殊的移动处理逻辑叫做 collide and slide
正如 Phys-x 物理引擎的 SDK 文档中所说,如果使用物理引擎来控制角色移动存在很多问题
- 缺乏连续碰撞检测,经典物理引擎使用离散碰撞检测,因此会出现
tunneling effecttunneling effect当角色移动过快的时候,可能会穿过墙壁,因此需要限制角色最大速度- 即使没有
tunneling,当角色在角落向前推时,会出现角色抖动的情况,因为物理引擎不断将其前后移动到略有不同的位置
- 无法直接控制,刚体通常由脉冲或力控制,无法直接将角色移动到最终位置
- 摩擦问题,当角色在斜坡上时,通常不应该滑动,因此会设置无限大的摩擦力,当这也导致角色无法向前移动
- 不受控制的跳跃,当角色快速移动并于物体碰撞时,角色不应该被弹开,比如角色从高空落下时,落地双腿完全,并且不会弹跳。但是由于
restitution的存在,会产生回弹效果
由于以上这些问题的存在,角色移动不能直接使用 物理引擎 来控制
collide and slide 算法
虚幻引擎将碰撞检测的信息封装成 FHitResult,虽然下面这些理论知识与虚幻引擎无关,为了方便参数解释,还是提前说明
| FHitResult 的属性 | 解释 |
|---|---|
| bBlockingHit | 是否发生碰撞 |
| Time | 碰撞后实际移动距离除以检测移动距离 |
| Distance | 碰撞后实际移动距离 |
| Location | 碰撞后最终位置 |
| ImpactPoint | 碰撞接触点 |
| Normal | 碰撞切面法向量 |
| ImpactNormal | 碰撞切面法向量(非胶囊体和球体检测与Normal不同) |
| TraceStart | 检测开始位置 |
| TraceEnd | 检测结束位置 |
| bStartPenetrating | 是否在检测开始就有渗透情况 |
| PenetrationDepth | 渗透深度 |
Sweep 检测
Sweep扫过、掠过、大范围伸展

以当前坐标为起点,以当前 速度 和 Delta 计算下一帧的理论坐标为终点,进行检测
如果中间检测到碰撞,则无法移动到终点坐标,从碰撞点计算角色下一帧真实坐标
TraceStart表示 检测起点,值为当前坐标TraceEnd表示 检测终点,值为理论下一帧坐标ImpactPoint表示 碰撞接触点Location表示 下一帧的实际坐标Distance表示 下一帧的实际坐标与当前坐标之间的距离Time表示 $\frac{Distance}{TraceEnd-TraceStart}$,是一个 0~1 之间的值
InitialOverlaps 检测

也就是在开始位置就检测到了重叠
这个时候 bStartPenetrating 值为 true,表示检测到了 InitialOverlaps
Penetrating 表示重叠深度
Penetrating: 渗透、贯穿、穿过
MoveAlongFloor
| 可以移动的坡度 | 不可移动的坡度 |
|---|---|
 |
 |
通过 速度、加速都、摩擦力、BrakingDeceleration 等,计算出最后的速度向量 Velocity * DeltaTime
根据地面坡度调整移动向量方向,例如可移动坡度的红色箭头
如果碰撞检测返回 Hit 的结果是 Block,表示检测到斜坡比较陡,那么可以将剩下的移动向量改为沿着面2移动
引擎通过 Hit.Normal 获取 面2 的法线方向,通过坡度检测,若夹角小于 WalkableFloorAngle 则判定为缓坡,可以行走;若夹角大于 WalkableFloorAngle 判定为陡坡,不可行走
随后第一次响应 沿面移动 SlideVector = OriginalDelta - (OriginalDelta • Hit.Normal) * Hit.Normal,之后再次调用 SafeMoveUpdatedComponent
此时再次射线检测,如果返回的 Hit 的结果还是 Blokc,表示面2 非常陡,可能需要 StepUp 上楼逻辑
StepUp
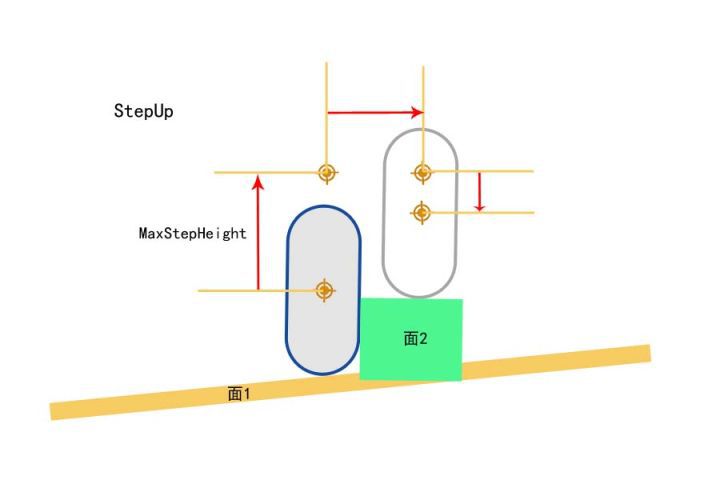
上楼逻辑分成 3 次移动构成
- 首先向上移动
MaxStepHeight高度 - 然后向前移动(如果前移过程中检测到 Block,那么需要执行 SlideAlongSurface)
- 最后向下移动,移动到面 2 上面
不过很多情况会导致 StepUp 失败
比如:移动过程中检测到穿透 Penetration,最终无法落到一个合适的落脚点
如果 StepUp 失败,需要调用 SlideAlongSurface 贴着面走
SlideAlongSurface
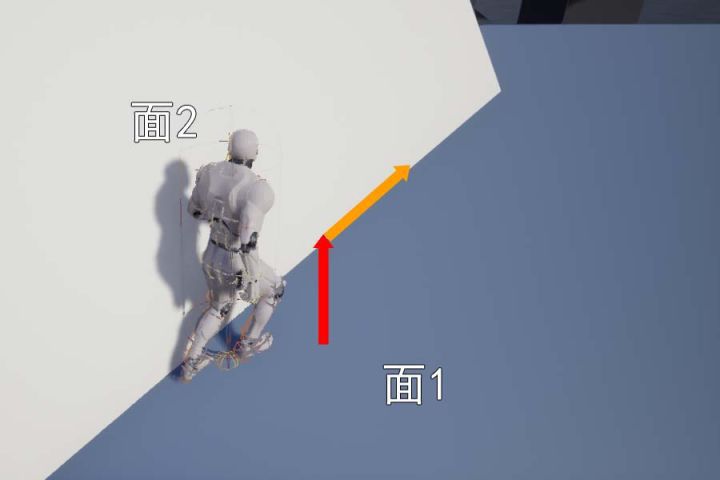
大概就是下面这个情况,会触发 SlideAlongSurface,红色向量是加速度方向
在计算 MoveAlongFloor 之后,由于 StepUp 失败,尝试 SlideAlongSurface
得到橙色向量为实际速度方向
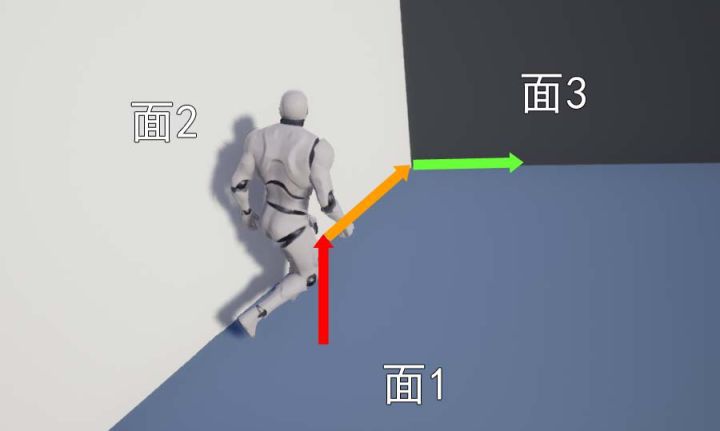
TwoWallAdjust
| 沿着 面3 向右移动 | 沿着 面3 向上移动 |
|---|---|
 |
 |
当我们通过 SlideAlongSurface 移动的时候,前面又出现一堵墙,此时需要计算 墙2 和 墙3 之间的角度,如果夹角大于 90°,那么可以沿着面3的方向继续移动
FindFloor
通过 FindFloor 可以计算得到脚下的地面信息,并包含在 FFindFloorResult 结构体中
| FFindFloorResult 属性 | 作用 |
|---|---|
| bBlockHit | 是否跟地面有碰撞 |
| bWalkableFloor | 可以行走的地面 |
| bLineTrace | 是否是通过line trace检测出来的结果 |
| FloorDist | Sweep查询到地面的距离 |
| LineDist | LineTrace查询到地面的距离 |
| HitResult | 跟地面的FHitResult |
ComputeFloorDist
一般情况下,只需要一次垂直向下 Sweep 检测就可以计算出 FloorDist

不过还会出现一种情况,那就是角色有一部分在地面里面

此时检测的 bStartPenetration 是 true
需要缩小叫能提,重新向下 Sweep 计算出来的 FloorDist - ShrinkHeight 就是原胶囊体跟地面的距离
所有缩小的胶囊体 Sweep 让然出现了穿透的情况,需要修改使用 Line Trace 并且从胶囊体中心向下检测胶囊体的半高,如何检测到了 Hit,则可以计算陷入地面以下的高度
无论是 Sweep 还是 LineTrace,单次调整的高度 MaxPenetrationAdjust 最大只能是胶囊体的半径,如果陷入地面的深度大于高度,无法一次调整到地面上,需要多帧处理
UE 的移动组件
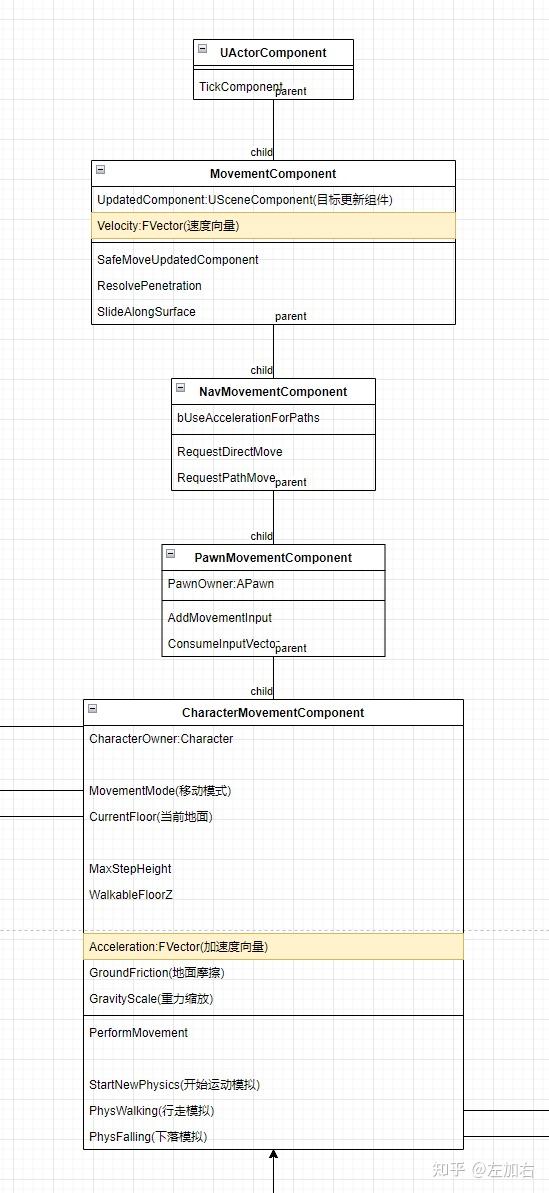
角色移动组件分层设计,各自负责不同的职责
| 组件 | 作用 |
|---|---|
| UMovementComponent | 基础移动 |
| UNavMovementComponent | 导航集成 |
| UPawnMovementComponent | 输入响应 |
| UCharacterMovementComponent | 角色物理 |
MovementComponent为基类,提供基本的更新坐标逻辑。通常用于 可推动的物理道具- 设置需要更新的组件(
UpdateComponent),通常是根组件,比如ACharacter的根胶囊体组件 - 设置需要更新的组件(
UpdatedPrimitive),用于物理交互,如果UpdateComponent能转换成UPrimitiveComponent会直接使用UpdateComponent - 设置
MoveComponentFlags,用于控制更新行为的精细开关 Velocity存储实时移动速度向量,是驱动组件运动的核心数据PlaneConstraintNormal定义移动约束平面的法线方向((0,1,1) 限制 Y 轴移动)PlaneConstraintOrigin定义移动约束平面的原点坐标,用于计算组件与平面的空间关系
- 设置需要更新的组件(
UpdatedComponent = IsValid(NewUpdatedComponent) ? NewUpdatedComponent : NULL;
UpdatedPrimitive = Cast<UPrimitiveComponent>(UpdatedComponent);
NavMovementComponent提供了AI寻路用的一些接口。通常用于 AI 控制的非人形物体NavAgentProps定义导航代理的物理特性和移动能力(如:半径、高度、最大速度、加速度等),用于路径计算和碰撞检测FixedPathBrakingDistance定义减速到停止的距离,由bUseFixedBrakingDistanceForPaths控制是否启用PathFollowingComp处理路径跟随逻辑,通常是UPathFollowingComponent
PawnMovementComponent定义了接受输入的接口。其Owner必须为APawn子类。通常用于自定义载具等
MoveUpdateComponent
UMovementComponent::MoveUpdateComponent 是真正执行物体移动逻辑的函数接口,并且该函数不是虚函数,子类无法重写
FORCEINLINE_DEBUGGABLE bool UMovementComponent::MoveUpdatedComponent(const FVector& Delta, const FRotator& NewRotation, bool bSweep, FHitResult* OutHit, ETeleportType Teleport)
{
	return MoveUpdatedComponentImpl(Delta, NewRotation.Quaternion(), bSweep, OutHit, Teleport);
}

bool UMovementComponent::MoveUpdatedComponentImpl( const FVector& Delta, const FQuat& NewRotation, bool bSweep, FHitResult* OutHit, ETeleportType Teleport)
{
	if (UpdatedComponent)
	{
		const FVector NewDelta = ConstrainDirectionToPlane(Delta);
		return UpdatedComponent->MoveComponent(NewDelta, NewRotation, bSweep, OutHit, MoveComponentFlags, Teleport);
	}

	return false;
}
对的,该函数直接调用 UpdatedComponent 的 MoveComponent,让组件自己更新自己
不过 USceneComponent::MoveComponentImpl 是虚函数,可以被子类重写,所以说根据设置的 UpdatedComponent 的不同,最后执行的移动逻辑也不相同
USceneComponent::MoveComponentImpl
对于 USceneComponent::MoveComponentImpl 的实现逻辑是比较简单的
- 检查能否移动,组件的
Mobility必须是Movable - 调用
ConditionalUpdateComponentToWorld确保组件的Transform已经更新 - 检测是否是零位移
Delta.IsZero(),零位移表示不用移动,也就无需后续计算 - 更新坐标和旋转
InternalSetWorldLocationAndRotation - 如果更新成功,则进行重叠检测
UpdateOverlaps,主要是递归更新AttachedChild,并且更新自己的PhysicsVolume信息
InternalSetWorldLocationAndRotation 逻辑相对简单
- 传入新的坐标、旋转参数
- 如果存在父节点,基于父节点的坐标信息,更新传入的坐标和旋转信息
- 判断是否存在坐标修改、旋转修改
- 如果存在 坐标 或者 旋转 修改,更新
RelativeLocation和RelativeRotation的值 - 根据
bCanEverAffectNavigation更新导航网格的信息
UPrimitiveComponent::MoveComponentImpl
前面说过 MoveComponentImpl 是一个虚函数
在 UMovementComponent 中的 UpdatedComponent 通常被设置为对象的根组件,而 ACharacter 的根组件是 UCapsuleComponent
UCapsuleComponent -> UShapeComponent -> UPrimitiveComponent
所以对于 ACharacter 来说,更新坐标执行的是 UPrimitiveComponent::MoveComponentImpl
接下来逐步对代码 MoveComponentImpl 进行解释
- 初始化并计算像移动方向进行
Sweep所需要的数据
// Set up
const FVector TraceStart = GetComponentLocation();  // 当前坐标
const FVector TraceEnd = TraceStart + Delta;        // 理论终点坐标
float DeltaSizeSq = (TraceEnd - TraceStart).SizeSquared();  // 移动距离的平方
const FQuat InitialRotationQuat = GetComponentTransform().GetRotation();  // 当前角度
注意这里 DeltaSizeSq 使用的是 SizeSquared,也就是长度的平方
节省了 sqrt 计算的性能,因为与 MinMovementDistSq 比较大小,不需要精确值,大概那个范围就行
- 当移动和旋转都是极小值时,跳过后续计算流程。如果只是移动距离值极小,那么将
DeltaSizeSq设置为 0
// ComponentSweepMulti does nothing if moving < KINDA_SMALL_NUMBER in distance, so it's important to not try to sweep distances smaller than that.
const float MinMovementDistSq = (bSweep ? FMath::Square(4.f* UE_KINDA_SMALL_NUMBER) : 0.f);
if (DeltaSizeSq <= MinMovementDistSq)
{
  // Skip if no vector or rotation.
  if (NewRotationQuat.Equals(InitialRotationQuat, SCENECOMPONENT_QUAT_TOLERANCE))
  {
    // copy to optional output param
    if (OutHit)
    {
      OutHit->Init(TraceStart, TraceEnd);
    }
    return true;
  }
  DeltaSizeSq = 0.f;
}
NewRotationQuat新角度与InitialRotationQuat当前角度
- 调用
MyWorld->ComponentSweepMulti进行Sweep检测
// static void PullBackHit(FHitResult& Hit, const FVector& Start, const FVector& End, const float Dist)
// {
// 	const float DesiredTimeBack = FMath::Clamp(0.1f, 0.1f/Dist, 1.f/Dist) + 0.001f;
// 	Hit.Time = FMath::Clamp( Hit.Time - DesiredTimeBack, 0.f, 1.f );
// }

TArray<FHitResult> Hits;

bool const bHadBlockingHit = MyWorld->ComponentSweepMulti(Hits, this, TraceStart, TraceEnd, InitialRotationQuat, Params);

if (Hits.Num() > 0)
{
  const float DeltaSize = FMath::Sqrt(DeltaSizeSq);
  for(int32 HitIdx=0; HitIdx<Hits.Num(); HitIdx++)
  {
    PullBackHit(Hits[HitIdx], TraceStart, TraceEnd, DeltaSize);
  }
}
PullBackHit函数实现以注释的形式在上面代码块中
还记得 DeltaSizeSq 是距离的平方吗?得到真正的距离 DeltaSize
由于物理引擎返回的碰撞点可能非常接近物体表面,由于浮点计算误差实际碰撞点可能略微嵌入碰撞体内部,可能会导致后续处理出现卡在表面或者抖动问题
使用 PullBackHit 将碰撞点拉回一点
FMath::Clamp(0.1f, 0.1f/Dist, 1.f/Dist) + 0.001f 保证最少有 0.001 的拉回,并且拉回的长度与距离反比
- 短距离移动,拉回更大的比例,因为精度问题更加突出,激进修正,确保稳定性
- 长距离移动,拉回较小的比例,精度问题相对较小,保守修正,保持准确性
- 筛选有效的碰撞结果,并准备后续事件处理
根据 阻挡碰撞 和 重叠事件 进行不同处理
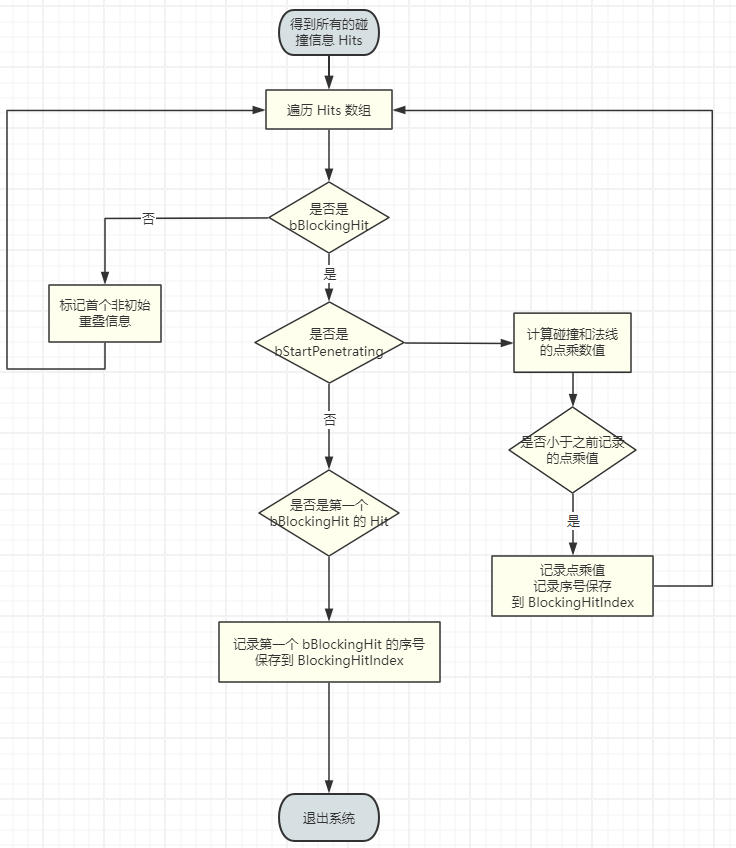
这里主要做了三个判断
- 如果出现了
bStartPenetrating,则表示一开始角色就与其他物体重叠了,遍历得到 方向 与 碰撞面法线 进行 点乘值最小的面 - 如果没有出现
bStartPenetrating,则保存第一个bBlockingHit的碰撞信息 - 如果出现了
Overlap,则记录其信息
如果先出现了 bStartPenetrating,表示角色与其他物体重合,需要首先解决重叠问题,其他的都不重要
并且,对于所有 bStartPenetrating 的 Hit,要找到 移动方向 和 接触面法向量 点乘最小的 Hit,这是因为最小的点乘意味着最直接相反的方向,能够高效的脱离穿透
移动方向 和 接触面法向量 点乘 的物理意义是 法线与移动方向几乎完全相反
如果先出现了普通的 bBlockingHit,表示角色没有与其他物体重合,那么其他的 bStartPenetrating 理论上就不会出现,也不重要
比阻挡碰撞点远的 Overlap 全部忽略,因为不会移动到那些 Overlap 的点
普通的 bBlockingHit |
出现 bStartPenetrating |
|---|---|
|
|
别忘了前面解释过的
collide and slide
- 根据筛选得到的 Hit 预处理数据
如果 bBlockingHit == false,则没有碰撞,移动的终点就是 TraceEnd 点
如果 bBlockingHit == true,则出现了碰撞,根据根据碰撞点的信息更新 NewLocation
如果 NewLocation 与 当前坐标 的距离极小,那么 NewLocation 就等于 当前坐标
- 计算对称旋转
bIncludesOverlapsAtEnd = AreSymmetricRotations(InitialRotationQuat, NewRotationQuat, GetComponentScale());
主要服务于碰撞检测的优化处理,对于胶囊体来说,绕 Z 轴旋转不影响碰撞
- 更新坐标和旋转朝向
bMoved = InternalSetWorldLocationAndRotation(NewLocation, NewRotationQuat, bSkipPhysicsMove, Teleport);
- 更新重叠事件
如果出现了移动 即 bMoved == true,则需要更新 Overlap 的信息
根据 IsDeferringMovementUpdates 判断是否需要延迟更新,如果延迟更新则将数据存储在 FScopedMovementUpdate 中,否则立刻调用 UpdateOverlaps
- 更新碰撞事件
如果出现了 bBlockingHit,并且需要发送碰撞事件,同样根据是否需要延迟更新来决定立刻发送事件,还是交给 FScopedMovementUpdate 来延迟发送
if (IsDeferringMovementUpdates())
{
  FScopedMovementUpdate* ScopedUpdate = GetCurrentScopedMovement();
  ScopedUpdate->AppendBlockingHitAfterMove(BlockingHit);
}
else
{
  DispatchBlockingHit(*Actor, BlockingHit);
}
CharacterMovementComponent
需要注意的是有一个 AsyncCharacterMovement 的全局变量,默认值为 false
默认情况下,UCharacterMovementComponent 的移动逻辑是在游戏线程(Game Thread)的同步 Tick 中执行的。如果启用 AsyncCharacterMovement,引擎会将部分移动计算(如物理模拟、速度更新等)分配到其他线程(如工作线程池)异步执行,从而减轻主线程的压力
不过这又涉及到 线程安全、同步延迟、调试复杂等问题
TickComponent
想要知道一个类做了哪些事情,最重要的就是看它在 Tick 中做了什么
- 是否开启物理模拟,物理模拟不做处理
防止物理引擎和移动组件同时修改 UpdatedComponent 的 Transform,导致不可预测的行为
const bool bIsSimulatingPhysics = UpdatedComponent->IsSimulatingPhysics();
- 更新
AvoidanceLockTimer的值
AvoidanceLockTimer -= DeltaTime;
AvoidanceLockTimer 是避障系统 Avoidance System 的核心计时器
- 防止避障抖动,当角色正在进行避障操作时,锁定一段时间避免频繁调整方向
- 解决避障冲突,多个角色互相避让时协调决策优先级
- 优化性能,避免不必要的避障计算频率
- 确保移动流畅性,避免角色在密集区域出现犹豫不决的摇摆现象
- 鉴定权限,走不同的执行逻辑
| ENetRol 类型 | 权限归属 | 含义 |
|---|---|---|
| ROLE_None | 无效角色 | 刚创建未初始化的 Actor 或即将销毁的对象 |
| ROLE_SimulatedProxy | 客户端模拟代理 | 客户端上非玩家控制的角色(如其他玩家/NPC) |
| ROLE_AutonomousProxy | 客户端自主代理 | 客户端上玩家自己控制的角色(本地玩家角色) |
| ROLE_Authority | 服务器权威 | 服务器端拥有最终控制权的对象(如游戏状态、NPC逻辑) |
如果是 ROLE_SimulatedProxy 是 其他玩家 或者 NPC,那么只需要同步位置和选择
else if (CharacterOwner->GetLocalRole() == ROLE_SimulatedProxy)
{
  if (bShrinkProxyCapsule)
  {
    AdjustProxyCapsuleSize();
  }
  SimulatedTick(DeltaTime);
}
如果是 受控角色
if (bShouldPerformControlledCharMove)
{
  ControlledCharacterMove(InputVector, DeltaTime);

  const bool bIsaListenServerAutonomousProxy = CharacterOwner->IsLocallyControlled()
                          && (CharacterOwner->GetRemoteRole() == ROLE_AutonomousProxy);

  if (bIsaListenServerAutonomousProxy)
  {
    ServerAutonomousProxyTick(DeltaTime);
  }
}
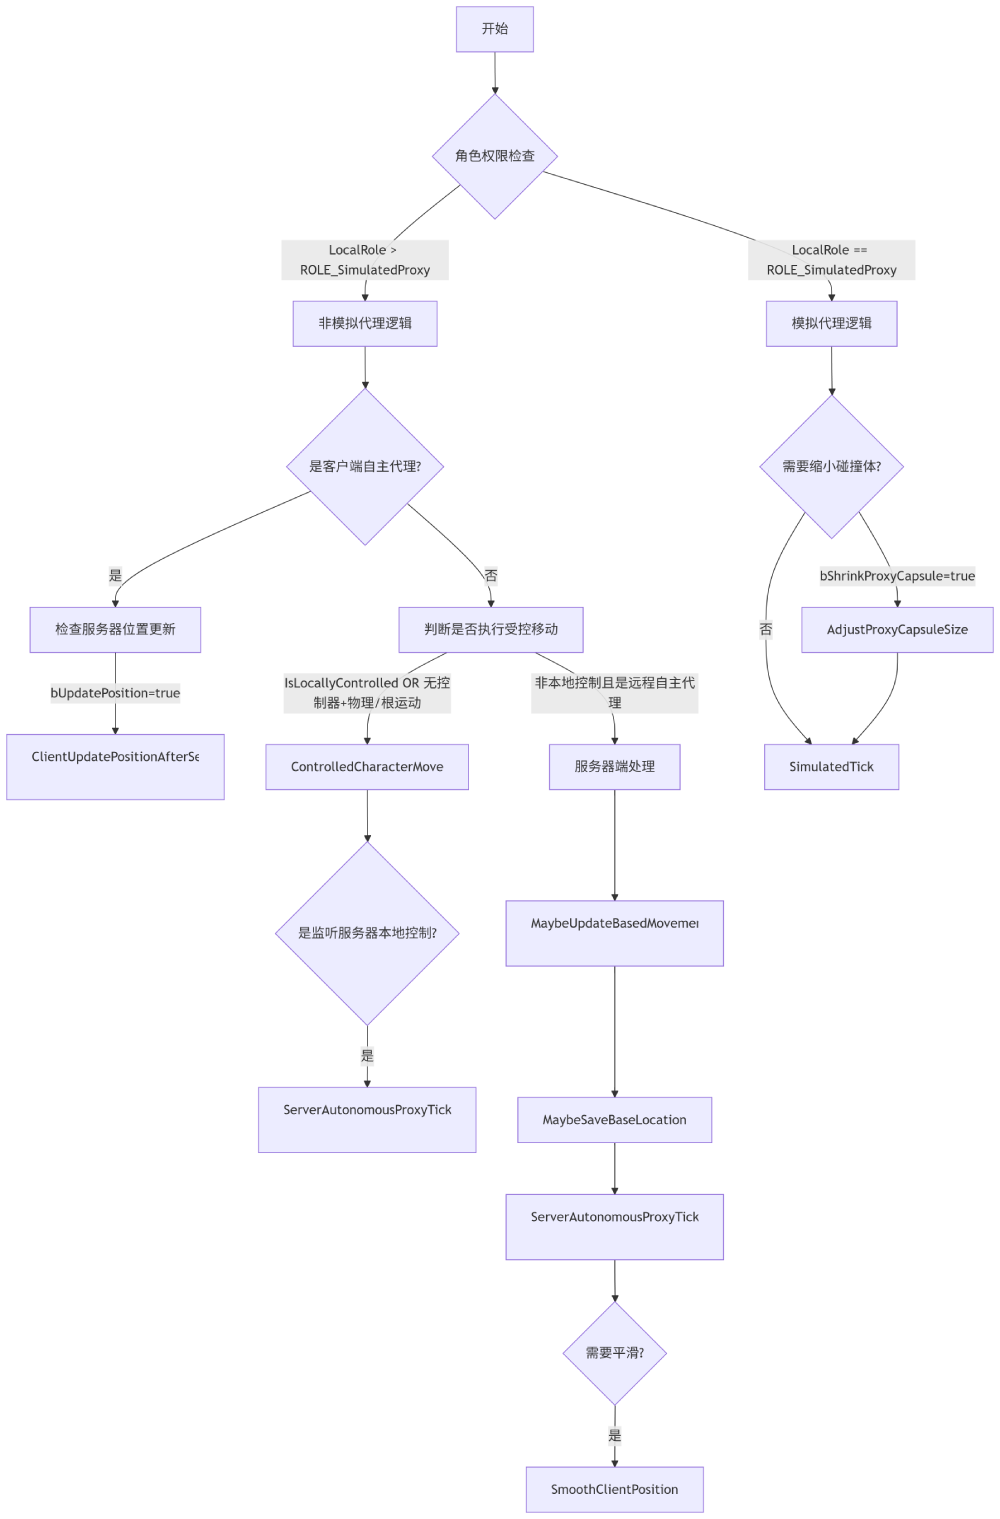
一般来说,单机本地角色只会执行 ControlledCharacterMove,后面也只对该函数进行讨论
- 判断是否需要处理 RVO 避障逻辑
if (bUseRVOAvoidance)
{
  UpdateDefaultAvoidance();
}
- 判断是否需要与物理交互
if (bEnablePhysicsInteraction)
{
  SCOPE_CYCLE_COUNTER(STAT_CharPhysicsInteraction);
  ApplyDownwardForce(DeltaTime);
  ApplyRepulsionForce(DeltaTime);
}
ControlledCharacterMove
{
  SCOPE_CYCLE_COUNTER(STAT_CharUpdateAcceleration);

  // We need to check the jump state before adjusting input acceleration, to minimize latency
  // and to make sure acceleration respects our potentially new falling state.
  CharacterOwner->CheckJumpInput(DeltaSeconds);

  // apply input to acceleration
  Acceleration = ScaleInputAcceleration(ConstrainInputAcceleration(InputVector));
  AnalogInputModifier = ComputeAnalogInputModifier();
}

if (CharacterOwner->GetLocalRole() == ROLE_Authority)
{
  PerformMovement(DeltaSeconds);
}
else if (CharacterOwner->GetLocalRole() == ROLE_AutonomousProxy && IsNetMode(NM_Client))
{
  ReplicateMoveToServer(DeltaSeconds, Acceleration);
}
代码逻辑也比较简单,就是根据权限进行不同的逻辑判断
| 角色类型 | 移动处理 | 同步方向 |
|---|---|---|
| 权威角色(Authority) | 直接执行PerformMovement | 向客户端广播状态 |
| 客户端自主代理(AutonomousProxy) | 本地预测+发送ReplicateMove | 向服务器发送输入 |
| 客户端模拟代理(SimulatedProxy) | 不在此处理 | 接收服务器状态 |
因为我们是本地运行,我们自己就是 Authority ,所以直接执行 PerformMovement 即可
通常来说,联机游戏的
Authority就是服务器;不过单机游戏的主角也是Authority
PerformMovement
- 记录是否发生了传送
当前帧与上一帧的坐标的不相同,表示发生了非连续性移动
bTeleportedSinceLastUpdate = UpdatedComponent->GetComponentLocation() != LastUpdateLocation;
- 如果 没有移动状态、根组件不可移动、开启物理模拟 提前退出移动计算
MovementMode == MOVE_None || UpdatedComponent->Mobility != EComponentMobility::Movable || UpdatedComponent->IsSimulatingPhysics()
- 记录是否需要强制在下一帧进行地面检测
如果当前 处于地面移动 或者 发生了传送
bForceNextFloorCheck |= (IsMovingOnGround() && bTeleportedSinceLastUpdate);
使用
|=是为了确保如果已经为 true,则保持 true。确保不覆盖其他代码路径设置的强制检测标志
- 根据
RootMotion添加移动速度
if( CurrentRootMotion.HasAdditiveVelocity() )
{
  const FVector Adjustment = (Velocity - LastUpdateVelocity);
  CurrentRootMotion.LastPreAdditiveVelocity += Adjustment;
}
- 定义
FScopedMovementUpdate
FScopedMovementUpdate 作用比较简单
- 在构造函数中根据条件判断执行
BeginScopedMovementUpdate - 在析构函数中根据条件判断执行
EndScopedMovementUpdate
{
		FScopedMovementUpdate ScopedMovementUpdate(UpdatedComponent, bEnableScopedMovementUpdates ? EScopedUpdate::DeferredUpdates : EScopedUpdate::ImmediateUpdates);

    // .... 很多很多移动计算
}
上述代码中,使用 {} 定义了一个作用域,当作用域结束之后会执行 ScopedMovementUpdate 的析构函数
- 缓存当前的速度和坐标
OldVelocity = Velocity;
OldLocation = UpdatedComponent->GetComponentLocation();
- 添加
Impulse(冲量) 和Force(力) 到速度上
Velocity += PendingImpulseToApply + (PendingForceToApply * DeltaSeconds);

PendingImpulseToApply = FVector::ZeroVector;
PendingForceToApply = FVector::ZeroVector;
这一步顺便判断了力的方向,如果存在 竖直方向 的 向上力 修改当前状态为 Move_Falling
if ( IsMovingOnGround() && (GravityRelativePendingImpulseToApply.Z + (GravityRelativePendingForceToApply.Z * DeltaSeconds) + (GetGravityZ() * DeltaSeconds) > UE_SMALL_NUMBER))
{
  SetMovementMode(MOVE_Falling);
}
- 更新角色状态
UpdateCharacterStateBeforeMovement(DeltaSeconds);
函数内容其实很简单,就是判断是否需要进入 蹲 的状态
根据 bWantsToCrouch、bIsCrouching 和 CanCrouchInCurrentState() 判断当前是否需要 以及 能够 进入或者退出 蹲 的状态
- 检查
Launch(跳跃)
如果调用了 Launch 想要跳跃,则直接用 跳跃 向量覆盖 Velocity,并设置当前状态为 MOVE_Failing,并设置 bForceNextFloorCheck 强制检查地面
if (!PendingLaunchVelocity.IsZero() && HasValidData())
{
  Velocity = PendingLaunchVelocity;
  SetMovementMode(MOVE_Falling);
  PendingLaunchVelocity = FVector::ZeroVector;
  bForceNextFloorCheck = true;
  return true;
}
- 清除旧的速度
PendingImpulseToApply = FVector::ZeroVector;    // 清空 冲量
PendingForceToApply = FVector::ZeroVector;      // 清空 力
PendingLaunchVelocity = FVector::ZeroVector;    // 清空 Launch速度

// 清除跳跃的输入 允许下一帧更新
CharacterOwner->ClearJumpInput(DeltaSeconds);
NumJumpApexAttempts = 0;
- 处理
RootMotion对Velocity的影响 - 调用
StartNewPhysics根据当前状态执行不同的更新函数
| 状态 | 调用函数 |
|---|---|
| MOVE_None | |
| MOVE_Walking | PhysWalking |
| MOVE_NavWalking | PhysNavWalking |
| MOVE_Falling | PhysFalling |
| MOVE_Flying | PhysFlying |
| MOVE_Swimming | PhysSwimming |
| MOVE_Custom | PhysCustom |
| 其他 | SetMovementMode(MOVE_None) |
- 再次调用
UpdateCharacterStateBeforeMovement
因为可能更新角色状态,此时可能不能再 蹲 了
- 更新角色朝向
如果当前存在 RootMotion 并且 不允许存在RootMotion时物理旋转,则跳过 PhysicsRotation
if (bAllowPhysicsRotationDuringAnimRootMotion || !HasAnimRootMotion())
{
  PhysicsRotation(DeltaSeconds);
}
很明显,如果存在
RootMotion优先使用RootMotion来计算旋转
- 根据
RootMotion更新朝向
PhysicsRotation
负责处理角色朝向的自动更新
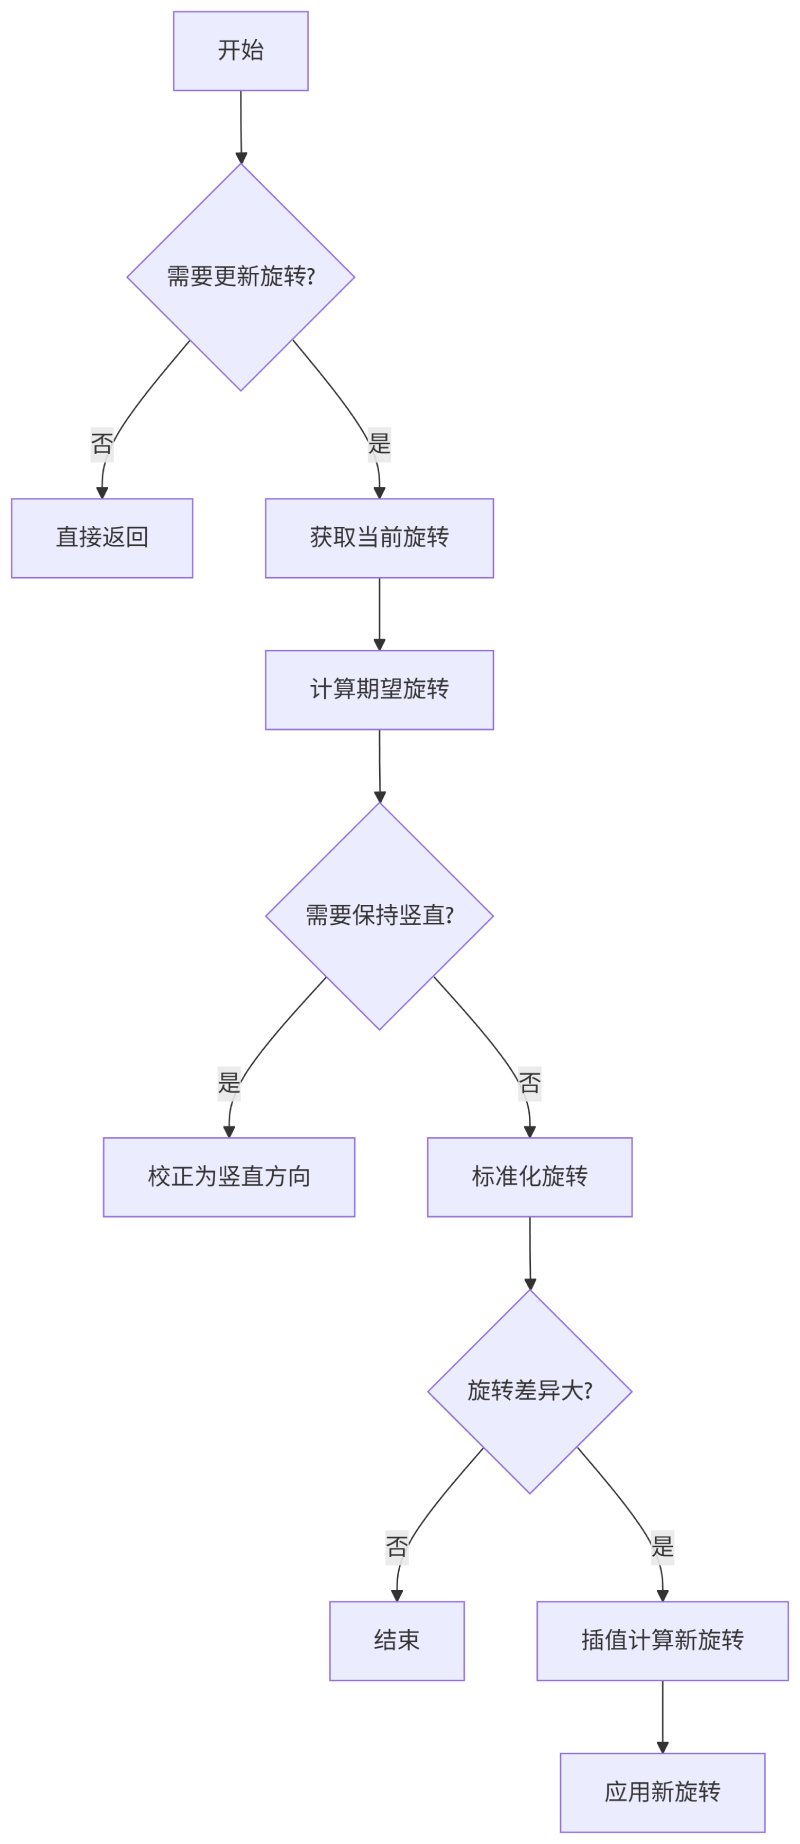
当 不需要朝向移动方向 也 不需要使用控制器朝向 的时候,不需要更新角色的 Rotation
bOrientRotationToMovement: 朝向移动方向bUseControllerDesiredRotation: 使用控制器朝向
获取角色当前朝向 CurrentRotation,获取本帧最大允许旋转 DeltaRot
有一个
RotationRate的配置属性,通过DeltaTime计算得到DeltaRot
最重要的其实是获取 DesiredRotation 也就是期望旋转朝向
如果朝向移动方向,则通过加速度 Acceleration 计算
DesiredRotation = Acceleration.GetSafeNormal().Rotation();
如果通过 Controller 计算,则需要拿到 Controller
DesiredRotation = CharacterOwner->Controller->GetDesiredRotation();
判断是否需要保持竖直 bWantsToBeVertical,防止角色倾斜(如RPG游戏)
如果 自定义重力
- 将期望旋转从世界空间转换到以重力方向为自定义重力的局部空间
- 将
Pitch和Yaw设置为 0 - 将期望旋转从局部空间转到世界空间
FRotator GravityRelativeDesiredRotation = (GravityToWorldTransform * DesiredRotation.Quaternion()).Rotator();
GravityRelativeDesiredRotation.Pitch = 0.f;
GravityRelativeDesiredRotation.Yaw = FRotator::NormalizeAxis(GravityRelativeDesiredRotation.Yaw);
GravityRelativeDesiredRotation.Roll = 0.f;
DesiredRotation = (WorldToGravityTransform * GravityRelativeDesiredRotation.Quaternion()).Rotator();
如果没有自定义旋转,那么很简单
DesiredRotation.Pitch = 0.f;
DesiredRotation.Yaw = FRotator::NormalizeAxis(DesiredRotation.Yaw);
DesiredRotation.Roll = 0.f;
接下来对得到的 DesiredRotation 进行插值处理
// YAW
if (!FMath::IsNearlyEqual(CurrentRotation.Yaw, DesiredRotation.Yaw, AngleTolerance))
{
  DesiredRotation.Yaw = FMath::FixedTurn(CurrentRotation.Yaw, DesiredRotation.Yaw, DeltaRot.Yaw);
}
ROLL、PITCH、YAW的处理相同,分别对三轴进行插值处理
最后调用 MoveUpdateComponent 来更新角色朝向
MoveUpdatedComponent( FVector::ZeroVector, DesiredRotation, /*bSweep*/ false );
CalcVelocity
无论是 Walk、Swim、Failing、Flying 都需要计算速度,之后进行后续移动逻辑判断
记录 Acceleration 加速度、MaxSpeed 最大速度、Friction 摩擦力
bZeroRequestedAcceleration 判断是否存在 AI 路径跟随的移动请求导致的加速度
- 如果强制最大加速度
- 如果当前存在加速度,则根据 加速度方向 乘以 最大加速度 得到 加速度
- 如果当前不存在加速度,则根据 朝向 或者 速度方向 乘以 最大加速度 得到 加速度
if (bForceMaxAccel)
{
  if (Acceleration.SizeSquared() > UE_SMALL_NUMBER)
  {
    Acceleration = Acceleration.GetSafeNormal() * MaxAccel;
  }
  else
  {
    Acceleration = MaxAccel * (Velocity.SizeSquared() < UE_SMALL_NUMBER ? UpdatedComponent->GetForwardVector() : Velocity.GetSafeNormal());
  }
  AnalogInputModifier = 1.f;
}
计算最大速度限制,这里 GetMinAnalogSpeed 是获取防抖最小速度,用于保证最小移动速度的
const float MaxInputSpeed = FMath::Max(MaxSpeed * AnalogInputModifier, GetMinAnalogSpeed());
MaxSpeed = FMath::Max(RequestedSpeed, MaxInputSpeed);
如果 没有加速度 或者 当前速度大于最大速度 则单独计算摩擦力对速度的影响
ApplyVelocityBraking(DeltaTime, ActualBrakingFriction, BrakingDeceleration);
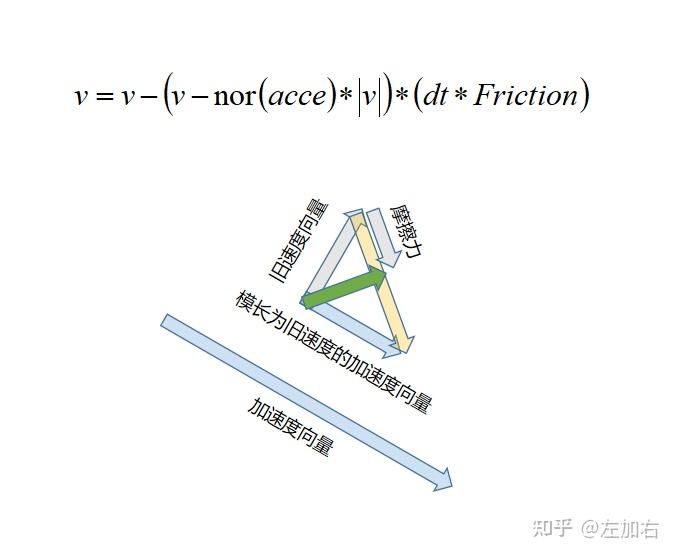
如果 存在加速度 计算加速度和摩擦力对速度的影响
Velocity = Velocity - (Velocity - AccelDir * Velocity.Size()) * FMath::Min(DeltaTime * Friction, 1.f);
注意,这里计算摩擦力时 摩擦力的方向 修正为
Velocity - AccelDir * Velocity.Size()既不是
如果 在流体中,摩擦力对速度三个轴都有影响
Velocity = Velocity * (1.f - FMath::Min(Friction * DeltaTime, 1.f));
应用输入加速度
const float NewMaxInputSpeed = IsExceedingMaxSpeed(MaxInputSpeed) ? Velocity.Size() : MaxInputSpeed;
Velocity += Acceleration * DeltaTime;
Velocity = Velocity.GetClampedToMaxSize(NewMaxInputSpeed);
应用路径请求的加速度
const float NewMaxRequestedSpeed = IsExceedingMaxSpeed(RequestedSpeed) ? Velocity.Size() : RequestedSpeed;
Velocity += RequestedAcceleration * DeltaTime;
Velocity = Velocity.GetClampedToMaxSize(NewMaxRequestedSpeed);
计算 RVO 避障,修改速度大小和方向
CalcAvoidanceVelocity(DeltaTime);
总的来说,先计算摩擦力,先将速度减去 摩擦力 * Delta,在加上 加速度 * Delta