
 NiceTry12138
645fad2266
fix: 修改错误
NiceTry12138
645fad2266
fix: 修改错误
|
преди 6 месеца | |
|---|---|---|
| .. | ||
| Image | преди 6 месеца | |
| README.md | преди 6 месеца | |
README.md
UI
在虚幻中,实现 UI 的方法就是通过 Slate 弯沉
方便内存管理和使用,UMG 使用 UObject 来持有 Slate 控件
比如, UImage 持有 SImage 控件
通常来说真正实现功能的方法都在 Slate 控件中
Slate 中常见控件分为三种
SLeafWidget不包含子节点的叶子节点,比如STextBlockSPanel可以包含多个子节点的,比如SVerticalBoxSCompoundWidget只能包含一个子节点,比如SButton
渲染

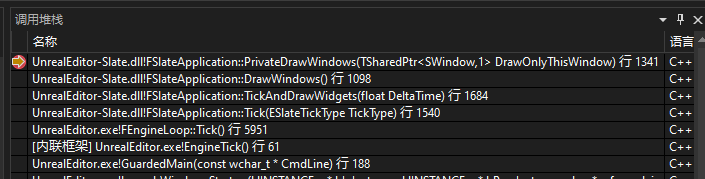
在 FEngineLoop::Tick 中,触发 FSlateApplication::Get().Tick 函数,用于 Slate 渲染
Slate 的渲染逻辑是每帧重新渲染所有的控件,这当然会带来大量的性能浪费,因为某些控件的变化频率并没有那么高,无需每帧更新,SInvalidationPanel 则是当控件的内容发生变化时,只需重新渲染发生变化的部分,而不是整个面板
于是在 PaintInvalidationRoot 函数中出现了这么一段内容
if (!Context.bAllowFastPathUpdate || bNeedsSlowPath || GSlateIsInInvalidationSlowPath)
	{
		GSlateIsOnFastUpdatePath = false;
		bNeedsSlowPath = false;
		CachedViewOffset = Context.ViewOffset;
		{
			if (Context.bAllowFastPathUpdate)
			{
				TGuardValue<bool> InSlowPathGuard(GSlateIsInInvalidationSlowPath, true);
				BuildFastPathWidgetList(RootWidget);
			}
			// Repopulates cached element lists
			CachedMaxLayerId = PaintSlowPath(Context);
		}
		Result.bRepaintedWidgets = true;
	}
	else if (!FastWidgetPathList->IsEmpty())
	{
		// We should not have been supplied a different root than the one we generated a path to
		check(RootWidget == FastWidgetPathList->GetRoot().Pin());
		Result.bRepaintedWidgets = PaintFastPath(Context);
	}
根据是否启用 bAllowFastPathUpdate 来决定执行 PaintSlowPath 全量计算,还是 PaintFastPath 快速计算
不过后续流程都是根据
PaintSlowPath进行参考
在 PaintSlowPath 中以 SWidget::PaintWindow 为入口,开始深度遍历所有的 Slate 控件
在 SWindow 调用到 SWindow::Paint,SWindow 继承自 SWidget 且没有重写 Paint,最后还是调用到 SWidget::Paint
PrePass
在调用 DrawWindowAndChildren 绘制之前,会调用 DrawPrepass
// Prepass the window
DrawPrepass( DrawOnlyThisWindow );
根据注释,可以知道这是在绘制之前的流程
- 执行自定义流程
CustomPrepass - 遍历子节点,对其执行
Prepass_ChildLoop - 缓存设计分辨率
CacheDesiredSize
void SWidget::Prepass_Internal(float InLayoutScaleMultiplier)
{
	PrepassLayoutScaleMultiplier = InLayoutScaleMultiplier;

	bool bShouldPrepassChildren = true;
	if (bHasCustomPrepass)
	{
		bShouldPrepassChildren = CustomPrepass(InLayoutScaleMultiplier);
	}

	if (bCanHaveChildren && bShouldPrepassChildren)
	{
		FChildren* MyChildren = this->GetChildren();
		const int32 NumChildren = MyChildren->Num();
		Prepass_ChildLoop(InLayoutScaleMultiplier, MyChildren);
		ensure(NumChildren == MyChildren->Num());
	}

	{
		CacheDesiredSize(PrepassLayoutScaleMultiplier.Get(1.0f));
		bNeedsPrepass = false;
	}
}
要自定义设计分辨率,需要重写 ComputeDesiredSize 函数,这是 SWidget 的纯虚函数,每个子类都要重写
virtual FVector2D ComputeDesiredSize(float LayoutScaleMultiplier) const = 0;
计算每个控件占据的控件大小,是一个自下而上的计算过程
- 不含子项的控件基于其本质属性计算和缓存其所需的大小
- 组合其他控件的控件使用特殊逻辑决定其所需的大小
ArrangeChildren
ArrangeChildren 函数负责计算子控件的几何信息并将其添加到 ArrangedChildren 列表中
ArrangeChildren 会在布局过程中被调用,子类可以重写 OnArrangeChildren 以实现自定义的子控件布局逻辑
void SWidget::ArrangeChildren(const FGeometry& AllottedGeometry, FArrangedChildren& ArrangedChildren, bool bUpdateAttributes) const
{
	if (bUpdateAttributes)
	{
		FSlateAttributeMetaData::UpdateChildrenOnlyVisibilityAttributes(const_cast<SWidget&>(*this), FSlateAttributeMetaData::EInvalidationPermission::DelayInvalidation, false);
	}

	OnArrangeChildren(AllottedGeometry, ArrangedChildren);
}
这里 OnArrangeChildren 是一个纯虚函数,需要每个子类重写自己的内容
virtual void OnArrangeChildren(const FGeometry& AllottedGeometry, FArrangedChildren& ArrangedChildren) const = 0;
以 SCanvas::OnArrangeChildren 为例
void SCanvas::OnArrangeChildren( const FGeometry& AllottedGeometry, FArrangedChildren& ArrangedChildren ) const
{
    for (int32 ChildIndex = 0; ChildIndex < Children.Num(); ++ChildIndex)
    {
        // ... 做一些计算

        ArrangedChildren.AddWidget( AllottedGeometry.MakeChild(
            CurChild.GetWidget(),
            CurChild.GetPosition() + Offset,
            Size
        ));
    }
}
以 SOverlay::OnPaint 为例,展示使用 ArrangeChildren 的使用
for (int32 ChildIndex = 0; ChildIndex < ArrangedChildren.Num(); ++ChildIndex)
{
    FArrangedWidget& CurArrangedWidget = ArrangedChildren[ChildIndex];

    const int32 CurWidgetsMaxLayerId =
        CurArrangedWidget.Widget->Paint(
            NewArgs,
            CurArrangedWidget.Geometry,
            MyCullingRect,
            OutDrawElements,
            MaxLayerId,
            InWidgetStyle,
            bChildrenEnabled);
}
将 Widget 的坐标偏移 和 大小 信息保存到 ArrangedChildren 中
FGeometry
一个 UI 控件,需要计算自己的尺寸大小、位置坐标,这些信息都可以用 FGeometry 来表示
FGeometry 包含了控件的位置、大小、缩放等等各种信息,它在控件布局、事件处理、坐标变换、子控件传递以及支持复杂变换等方面发挥重要作用
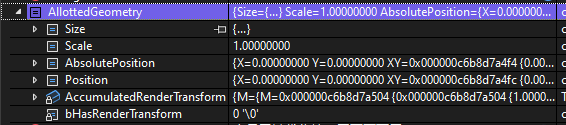
成员属性比较简单
Size: 表示控件在本地空间(Local Space)中的大小,即控件自身坐标系中的宽度和高度。这个字段主要用于描述控件的内部布局和尺寸Scale: 表示控件的缩放因子。这个字段用于描述控件在屏幕空间(Screen Space)中的缩放程度。这个值是累积的,包括了控件本身以及其所有父控件的缩放AbsolutePosition: 表示控件在屏幕空间中的位置,即控件相对于屏幕或应用程序窗口的左上角的坐标。这个字段主要用于描述控件在屏幕上的位置Position: 表示控件在本地空间中的位置。这个字段主要用于描述当前控件相对于其父控件的位置。AccumulatedRenderTransform: 表示从控件的本地空间到屏幕空间的累积渲染变换。这个变换包括了控件本身以及其所有父控件的渲染变换。这个字段主要用于在渲染过程中对控件应用复杂的变换,例如旋转、缩放和平移等bHasRenderTransform: 一个布尔值,表示控件是否具有渲染变换。这个字段用于在需要时快速检查控件是否具有渲染变换,以便在渲染过程中进行相应的处理
在 Slate 框架中,通常需要在本地空间和屏幕空间之间进行坐标转换。例如在处理控件的布局和点击事件时,需要将本地空间中的坐标转换为屏幕空间中的坐标,以便确定控件在屏幕上的实际位置
在这些计算的时候, FGeometry 可以发挥很大的作用
Paint
根据几何信息(AllottedGeometry)和父级剪裁矩形(MyCullingRect)计算当前 Widget 的剪裁边界(CullingBounds)
FSlateRect CullingBounds = CalculateCullingAndClippingRules(AllottedGeometry, MyCullingRect, bClipToBounds, bAlwaysClip, bIntersectClipBounds);
将 AllottedGeometry 计算成桌面坐标
混合父级样式和当前 Widget 的透明度
FWidgetStyle ContentWidgetStyle = FWidgetStyle(InWidgetStyle).BlendOpacity(RenderOpacity);

FGeometry DesktopSpaceGeometry = AllottedGeometry;
DesktopSpaceGeometry.AppendTransform(FSlateLayoutTransform(Args.GetWindowToDesktopTransform()));
根据 Flag 指定定时逻辑,更新控件
if (HasAnyUpdateFlags(EWidgetUpdateFlags::NeedsActiveTimerUpdate))
{
    // ... do something
    MutableThis->ExecuteActiveTimers(Args.GetCurrentTime(), Args.GetDeltaTime());
}

if (HasAnyUpdateFlags(EWidgetUpdateFlags::NeedsTick))
{
    // ... do something
    MutableThis->Tick(DesktopSpaceGeometry, Args.GetCurrentTime(), Args.GetDeltaTime());
}
这里执行
Tick,大部分控件的更新逻辑都在Tick中执行
将当前 Widget 压入绘制栈,缓存句柄
如果当前 Widget 可见并且支持命中测试,将其添加到命中测试网格 FHittestGrid 中
OutDrawElements.PushPaintingWidget(*this, LayerId, PersistentState.CachedElementHandle);

if (bOutgoingHittestability)
{
    Args.GetHittestGrid().AddWidget(MutableThis, 0, LayerId, FastPathProxyHandle.GetWidgetSortOrder());
}
调用 OnPaint 由子类自行实现生成实际绘制指令
int32 NewLayerId = OnPaint(UpdatedArgs, AllottedGeometry, CullingBounds, OutDrawElements, LayerId, ContentWidgetStyle, bParentEnabled);
OnPaint
SPanel 和 SCompoundWidget 因为存在子节点,需要先调用 PaintArrangedChildren 计算每个子节点的坐标、大小
ArrangeChildren(AllottedGeometry, ArrangedChildren);
如果是
SLeafWidget则不用,毕竟没有子节点没必要计算
SPanel 和 SCompoundWidget 再对每个子节点调用 Paint
for (int32 ChildIndex = 0; ChildIndex < ArrangedChildren.Num(); ++ChildIndex)
{
    const FArrangedWidget& CurWidget = ArrangedChildren[ChildIndex];

    if (!IsChildWidgetCulled(MyCullingRect, CurWidget))
    {
        const int32 CurWidgetsMaxLayerId = CurWidget.Widget->Paint(NewArgs, CurWidget.Geometry, MyCullingRect, OutDrawElements, LayerId, InWidgetStyle, bShouldBeEnabled);
        MaxLayerId = FMath::Max(MaxLayerId, CurWidgetsMaxLayerId);
    }
    else
    {
        //SlateGI - RemoveContent
    }
}
不过前面都是收集数据、遍历节点,真正绘制的内容其实是下面这样,以 SButton::OnPaint 为例
FSlateDrawElement::MakeBox(
    OutDrawElements,
    LayerId,
    AllottedGeometry.ToPaintGeometry(),
    BrushResource,
    DrawEffects,
    BrushResource->GetTint(InWidgetStyle) * InWidgetStyle.GetColorAndOpacityTint() * GetBorderBackgroundColor().GetColor(InWidgetStyle)
);
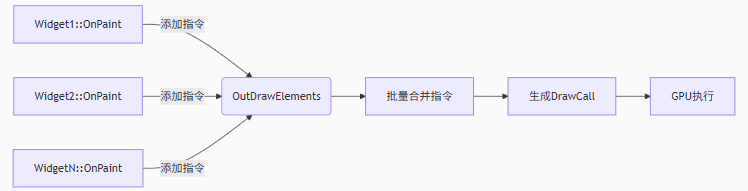
FSlateDrawElement 是 Slate 渲染系统的原子绘制单元,封装了 GPU 绘制所需的所有元数据
OutDrawElements 是由 SWindow 创建,用于收集绘制信息。通过遍历所有节点时,由每个节点各自添加各自的绘制指令到 OutDrawElements 中
HittestGrid
https://zhuanlan.zhihu.com/p/346460371
用户在屏幕上 Click 一下,如何知道点击的是哪一个控件呢?
如果 UI 控件数量很多,直接是深度优先遍历全部控件,是比较浪费时间的
FHittestGrid 是将屏幕划分成多个区域,缓存每个区域中的 控件 信息,在点击时根据点击坐标,从对应区域获取控件即可
在 SWindow::PaintWindow 函数调用 PaintInvalidationRoot 进行绘制之前重设 HittestGrid
由此可见,每个 SWindow 中都存储自己的 HittestGrid
const bool HittestCleared = HittestGrid->SetHittestArea(GetPositionInScreen(), GetViewportSize());
在每个控件绘制的时候,都会将自己添加到 HittestGrid 中
Args.GetHittestGrid().AddWidget(MutableThis, 0, LayerId, FastPathProxyHandle.GetWidgetSortOrder());
也就是说,为了绘制而遍历每个控件的时候,顺便就把 HittestGrid 给完成了
当用户点击的时候,会通过 HittestGrid 计算对应控件的 FWidgetPath

HittestGrid 将每个格子大小设置为 128 * 128
根据传入的点的坐标,直接计算出对应 Grid 的序号
const FVector2f CellSize(128.0f, 128.0f);

FIntPoint FHittestGrid::GetCellCoordinate(UE::Slate::FDeprecateVector2DParameter Position) const
{
	return FIntPoint(
		FMath::Min(FMath::Max(FMath::FloorToInt(Position.X / CellSize.X), 0), NumCells.X - 1),
		FMath::Min(FMath::Max(FMath::FloorToInt(Position.Y / CellSize.Y), 0), NumCells.Y - 1));
}
事件触发
https://zhuanlan.zhihu.com/p/448050955
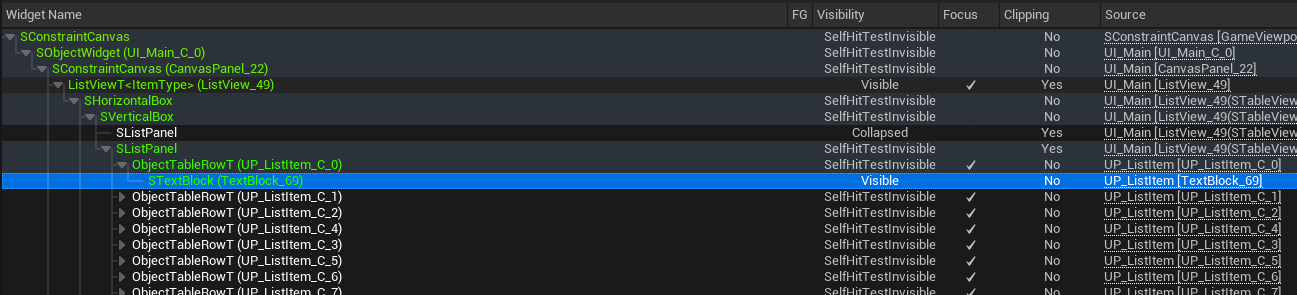
ListView
基本使用
| 流程 | 示例 |
|---|---|
| 自定义 Entry 实现接口 |  |
| ListView 配置 Entry | 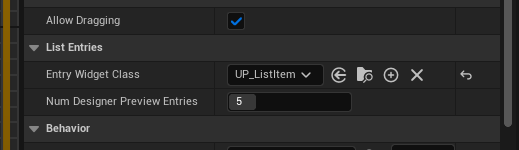 |
| 定义 UObject 作为 Item 存储 Data |  |
| 向 ListView 中添加数据 | 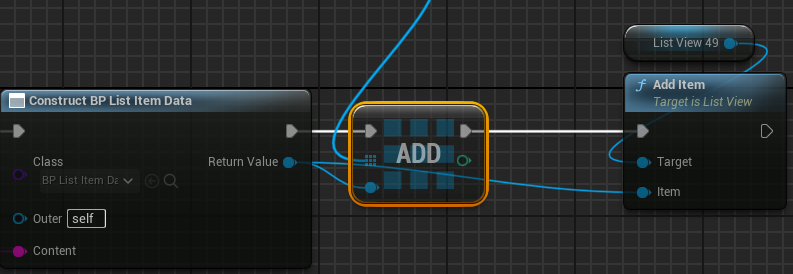 |
https://zhuanlan.zhihu.com/p/370249957
ListView 定义 Item 和 Entry 两个概念, Item 用于存储原始数据,Entry 用于表示实际的 UserWidget 控件
使用 ListView 是为了性能优化,在有大量数据的情况下,并不需要创建对应数量的 UserWidget 控件,因为屏幕大小有限无法将所有数据全部显示出来
理论上只需要创建屏幕空间最大能显示的 UserWidget 数量,再滑动 ListView 时将上方移动出显示区域的 UserWidget 移动到下方,再将要显示的数据替换到 UserWidget 中
后面用
Entry替代UserWidget
实际上也是这么做的,当 Entry 数据需要更新的时候,会触发接口中的 OnListItemObjectSet 函数,并将存储这 Item 信息的 UObject 作为参数传递
在 Entry 中只实现该接口,将传入的 UObject* 转换(Cast)成 Item 的数据类型即可
AddItem
当使用 AddItem 将 Item 添加到 ListView 的时候,会触发 RequestRefresh 函数用于刷新表现效果
不过通常一次性可能会添加很多数据到 ListView 中,所以每次添加都全部重新计算是极其危险的行为
void UListView::AddItem(UObject* Item)
{
    // ... do something
	ListItems.Add(Item);
    // ... do something
	RequestRefresh();
}
注意函数名称是 RequestRefresh,只是请求刷新,并非执行刷新
在真正执行逻辑的接口中是这样的
void STableViewBase::RequestLayoutRefresh()
{
	if (!bItemsNeedRefresh)
	{
		bItemsNeedRefresh = true;
		RegisterActiveTimer(0.f, FWidgetActiveTimerDelegate::CreateSP(this, &STableViewBase::EnsureTickToRefresh));
	}

	if (ItemsPanel.IsValid())
	{
		ItemsPanel->SetRefreshPending(true);
	}

	Invalidate(EInvalidateWidget::Layout);
}
将 bItemsNeedRefresh 设置为 true
在前面 OnPaint 函数源码中可以看到,在绘制之前,会根据 bItemsNeedRefresh 的值判断是否需要执行 Tick 函数
所以,这里的操作就是为了能够记录这一帧是否需要刷新,并在绘制的时候执行 Tick,真正的刷新显示效果

正如上面代码的执行流程,在 Tick 函数中执行了 ReGenerateItems 对每一个项都进行的刷新
FWidgetGenerator
FWidgetGenerator 是一个用于存放映射关系的容器
SListView<ItemType>* OwnerList;
TMap< ItemType, TSharedRef<ITableRow>, FDefaultSetAllocator, MapKeyFuncs > ItemToWidgetMap;
TMap< const ITableRow*, ItemType > WidgetMapToItem;

TArray< ItemType > ItemsWithGeneratedWidgets;
TArray<ItemType> ItemsToBeCleanedUp;
存储了 ListView 的原始指针 OwnerList
存储了 Entry 映射 Item 的 WidgetMapToItem
存储了 Item 映射 Entry 的 ItemToWidgetMap
存储了当前有用所有 Entry 的 ItemsWithGeneratedWidgets
存储了需要被销毁 Entry 的 ItemsToBeCleanedUp
ReGenerateItems
Update generate Widgets for Items as needed and clean up any Widgets that are no longer needed.
按需更新生成的 Widgets,清理不需要的 Widgets
对每一项进行更新的 GenerateWidgetForItem 函数
float GenerateWidgetForItem( const ItemType& CurItem, int32 ItemIndex, int32 StartIndex, float LayoutScaleMultiplier )
ItemType当钱定义的 Item 的数据类型CurItem当前要显示的数据信息的地址ItemIndex当前 Item 的序号StartIndex当前 ListView 显示的第一个 Item 的序号
CurItem 是需要显示的数据,首先就要获取 Item 对应的 Entry,如果没有则需要创建
TSharedPtr<ITableRow> WidgetForItem = WidgetGenerator.GetWidgetForItem( CurItem );
if (!WidgetForItem.IsValid())
{
    WidgetForItem = this->GenerateNewPinnedWidget(CurItem, ItemIndex, NumPinnedItems);
}
WidgetGenerator可以通过Item的地址,可以映射到对应Entry
更新 Entry 对应的信息
WidgetForItem->SetIndexInList(ItemIndex);
WidgetGenerator.OnItemSeen( CurItem, WidgetForItem.ToSharedRef() );
在 OnItemSeen 函数中,会顺便更新映射关系,通过执行 Private_OnEntryInitialized 最终会触发接口中更新数据的函数
恰好 Entry 继承了这个接口并且实现了这个函数,通过这种方式来更新 Entry 中的数据
if ( bWidgetIsNewlyGenerated )
{
    ItemToWidgetMap.Add( InItem, InGeneratedWidget );
    WidgetMapToItem.Add( &InGeneratedWidget.Get(), InItem );

    OwnerList->Private_OnEntryInitialized(InItem, InGeneratedWidget);
}

// We should not clean up this item's widgets because it is in view.
ItemsToBeCleanedUp.Remove(InItem);
ItemsWithGeneratedWidgets.Add(InItem);
所以,如果使用 TArray 自己也保存了一份 Item 的数据信息,在手动更新完 Item 中的数据时,需要手动调一下 RegenerateAllEntries 重新生成所有的 Entry