
Vuejs.md 20 KB
Vue.js
简单使用
介绍、例子
Vue 的本质就是一个 Javascript 的库
使用方式
- 页面中通过
CDN导入 - 下载
Vue的JS文件 - 通过
npm包管理工具安装 - 直接通过
Vue CLI工具生成项目

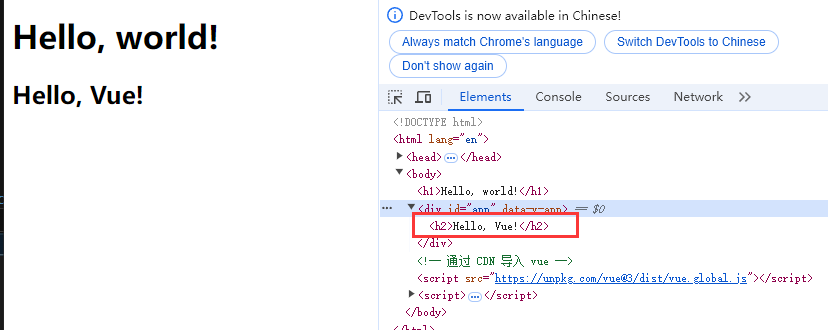
以当前官网推荐的 CDN 地址为例,从源码上看可以发现 VueJS 定义了一个全局变量 Vue,很多功能都是直接通过这个全局对象进行操控的
以直接通过 CDN 导入为例
<!DOCTYPE html>
<html lang="en">
<head>
    <meta charset="UTF-8">
    <meta name="viewport" content="width=device-width, initial-scale=1.0">
    <title>My Web Page</title>


</head>
<body>
    <h1>Hello, world!</h1>
    <div id="app"> </div>
    <!-- 通过 CDN 导入 vue -->
    <script src="https://unpkg.com/vue@3/dist/vue.global.js"></script>
    <script>
        const app = Vue.createApp({
            template: `<h2>{{ message }}</h2>`,

            data() {
                return {
                    message: 'Hello, Vue!'
                }
            }
        });
        app.mount('#app');  // 将 App 对象挂载到 id 为 app 的元素上
    </script>
</body>
</html>
通过 Vue.createApp 创建了一个 Vue 对象,再通过 id 将对象绑定到 <div id="app"> 中
mount就是挂载
<script>
Vue.createApp({
    template: `
        <h2> value = {{ counter }}</h2>
        <button @click='increment'>+1</button>
        <button @click='decrement'>-1</button>
    `,
    // 定义属性,data 是个函数
    data: function() {
        return {
            counter: 100
        }
    },
    // 定义方法
    methods: {
        increment() {
            this.counter++;
        },
        decrement() {
            this.counter--;
        }
    }
}).mount("#app1");
</script>
使用响应式,Vue 中使用 {{ }} 可以获取 data 返回的对象中的属性,在 methods 中可以通过 this 获取 data 返回对象的代理
对比原生的 JS 和 Vue 的开发来说
- 原生 JS 更像命令式编程,即先获取对象,再修改参数,最后设置回去
- Vue 更像是声明式编程,即提前声明数据、方法,然后将数据和方法绑定到
template中,将显示与数据进行分离
通常将 Vue 看作是 MVVM(Module-Vie-MoudleView) 框架。虽然官方说法是 Vue 并没有完全遵守 MVVM 模型,但整体设计受 MVVM 的启发
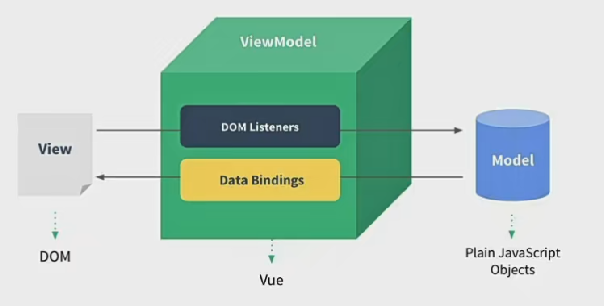
如上图所示
- 通常将
Dom或者Vue对象中的template认为是View(视图)- 因为
Vue的template会先生成vdom再渲染为真实Dom
- 因为
- 通常将整个 Javascript 对象看作是 Module
- 一般
Vue对象的template会分离出去,保留data和methods,这一块被认为是Module
- 一般
Vue帮助将Module和View进行绑定,比如View直接通过{{message}}就可以显示Module的data的message属性- 按上图,
Vue进行了Data Bindings进行数据绑定,将 Model 的数据绑定到 View 上 - 按上图,
Vue进行了Dom Listeners进行了事件监听
- 按上图,
template、data、methods
通过前面的例子,已经可以知道 Vue.createApp 传入对象的 template 属性的作用了,Vue 通过 template 属性进行一个效果显示
template 属性就表示 Vue 需要帮助渲染的模板信息。其中会写很多 Html 标签,这些标签会替换掉关在到的元素的 innerHTML
template 中有一些起卦的语法,比如 {{}}、@click,这些都是 template 特有的语法
也就说如果原本挂载标签中有内容,Vue 挂载之后会先把原内容清空
不过这个 template 的写法略显麻烦,并且 IDE 无法提供提示
因此 Vue 提供了两种来解决这个问题
- 使用 script 标签,并且标记类型为 x-template
- 使用任意标签(通常使用 template,因为不会被渲染),设置 id
template 元素是一种用于保存客户端内容的机制,该内容在加载页面时不会被呈现,但随后在运行时使用 JS 实例化
<script type="x-template" id="template1">
        <h2>{{ message }}</h2>
</script>
<div id="app2"></div>
<script>
    Vue.createApp({
        // 通过 template1 查找 id 为 template1 的标签并将内容设置到 template 中
        template: '#template1',
        data() {
            return {
                message: 'Hello, Vue!'
            }
        }
    }).mount('#app2');
</script>
<div id="app3"></div>
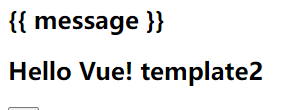
<template id="template2">
<h2>{{ message }}</h2>
</template>
<script>
Vue.createApp({
template: '#template2',
data() {
return {
message: 'Hello, Vue! template2'
}
}
}).mount('#app3');
</script>
template标签 其实不仅可以用 template,还可以使用其他任何标签,主要是 template 不会被渲染。因为本质来说都是使用
document.querySelector来查找对象
通过前面的例子,可以知道传入 Vue.createApp 的对象的 data 属性的作用,该属性在 Vue3 中必须是一个函数,否则报错
data 中返回的对象会被 Vue 的响应式系统劫持,只会对该对象的修改或者访问都会在劫持中被处理
这就是为什么 {{message}} 可以显示 message 的数据,以及为什么修改 message 的值其显示内容也会改变
通过前面的例子,可以知道传入 Vue.createApp 的对象的 methods 属性用于定义系列功能函数,这些方法可以绑定到 template 模板中,同时这些方法可以通过 this 关键字来直接访问到 data 中返回的对象的属性
除了前面几个属性之外,还有可以定义很多其他的属性,比如:props、computed、watch、emits、setup 和 声明周期函数等
源码查看
在 dev 中开启 sourcemap 源码映射,然后示例项目进行测试即可
methods 中禁止使用箭头函数
<div id="app3"></div>
<template id="template2">
    <h2>{{ message }}</h2>
    <button @click="btnClick">测试</button>
</template>
<script>
    Vue.createApp({
        template: '#template2',
        data() {
            return {
                message: 'Hello, Vue! template2'
            }
        },
        methods: {
            btnClick: () => {
                console.log(this);
                console.log(this.message);
            }
        }
    }).mount('#app3');
</script>
首先 methods 中定义的函数通常要通过 this 来访问 data 的属性,如果 methods 里面定义箭头函数,函数中使用的 this 其实是 Window 对象,也就是浏览器窗口对象
在 Window 对象中肯定是没有名为 message 的属性的,所以使用 this.message 会直接报错
在箭头函数中是不绑定 this 的
<script>
    const foo = function() {
        console.log(this);
    }
    foo();  // 输出 Window
    const obj = {bar: foo};
    obj.bar();  // 输出 obj 对象
</script>
普通函数执行时都会进行 this 的绑定,也就是说 foo() 其实是 Window.foo() 进行了隐式绑定
<script>
    const foo = () => {
        console.log(this);
    }
    foo();  // 输出 Window
    const obj = {bar: foo};
    obj.bar();  // 输出 Window

    const foo1 = foo.bind(obj);
    foo1();
</script>
箭头函数不会绑定 this,所以此时无论是 foo() 还是 obj.bar() 输出的都是 Window
为什么都是都是 Window 是因为箭头函数中的 this 并没有进行任何绑定,所以找不到 this 对象,于是就会像上层作用域查找 this 对象,最后找到 Window 对象
<script>
    const obj = {
        {
            template: '#template2',
            data() {
                return {
                    message: 'Hello, Vue! template2'
                }
            },
            methods: {
                btnClick: () => {
                    console.log(this);
                    console.log(this.message);
                }
            }
        }
    }
    Vue.createApp(obj).mount('#app3');
</script>
这里 btnClick 的上层作用域并不是 methods,methods 只是在定义对象,obj 也只是定义对象,所以 btnClick 上层作用域其实是 <script> 最终找的的是 Window
以源码 componentOptions.ts 中代码示例
if (methods) {
    for (const key in methods) {
        const methodHandler = (methods as MethodOptions)[key]
        if (isFunction(methodHandler)) {
            // In dev mode, we use the `createRenderContext` function to define
            // methods to the proxy target, and those are read-only but
            // reconfigurable, so it needs to be redefined here
            if (__DEV__) {
                Object.defineProperty(ctx, key, {
                value: methodHandler.bind(publicThis),
                configurable: true,
                enumerable: true,
                writable: true,
                })
            } else {
                ctx[key] = methodHandler.bind(publicThis)
            }
            if (__DEV__) {
                checkDuplicateProperties!(OptionTypes.METHODS, key)
            }
        } else if (__DEV__) {
            warn(
                `Method "${key}" has type "${typeof methodHandler}" in the component definition. ` +
                `Did you reference the function correctly?`,
            )
        }
    }
}
const publicThis = instance.proxy
通过上述代码,可以看到其实就是将 methods 中每个函数都取出来然后通过 bind 绑定函数的 this 为 publicThis
关于 bind 的使用,当一个方法使用 bind 绑定对象时会返回一个新的方法,新的方法就是绑定了对象之后的方法
function foo() {
    console.log(this);
}
foo();  // 输出 Window
var obj = {bar: "foo"};

var foo1 = foo.bind(obj);
foo1();
模板语法
React 使用的 jsx,对应的代码都是编写的类似于 js 的一种语法。之后通过 Babel 将 jsx 编译成 React.CreateElement 函数调用
Vue 也支持 Jsx 的开发模式,但是大多数情况系啊,使用基于 HTML 的模板语法。在模板中,允许开发者以声明式的方式将 DOM 和 底层组件实例的数据 绑定在一起。在底层的实现中, VUe 将模板编译成虚拟 DOM 渲染函数
如果希望将数据显示到模板中,使用最多的语法是 Mustache 语法(双大括号)的文本插值,Mustache 不仅支持属性显示还支持 JS 表达式和函数调用
<div id="app4"></div>
<template id="template3">
    <h2>{{ getReverseMessage() }}</h2>
    <h2>{{ message }}</h2>
    <h2>{{ `${message} ~~~~~~~~~` }}</h2>
    <h2>{{ message.split(" ") }}</h2>
    <h2>{{ message === undefined ? "true" : "false" }}</h2>
</template>
<script>
    Vue.createApp({
        template: '#template3',
        data() {
            return {
                message: 'Hello  Vue! template2'
            }
        },
        methods: {
            getReverseMessage() {
                return this.message.split(" ").reverse().join(" ");
            }
        }
    }).mount('#app4');
</script>
注意 Mustache 只支持表达式,并不支持语句,下面都是错误写法
<h2> let name = "abc" </h2>
<h2> if(message === undefined) { return "true" }  </h2>
赋值语句、条件判断语句
v-once 指令
v-once 用于指定元素或者组件只渲染一次,当数据发生变化时,元素或者组件以及其所有的子元素将视为静态内容并且跳过,该指令可以用于性能优化
<div id="app5"></div>
<template id="template5">
    <div v-once>
        <h2>{{ count }}</h2>
        <h2>{{ message }}</h2>
    </div>
    <h2>{{ count }}</h2>
    <h2>{{ message }}</h2>
    <button @click="addCount">+1</button>
</template>
<script>
    Vue.createApp({
        template: '#template5',
        data() {
            return {
                message: 'Hello  Vue! template2',
                count: 100
            }
        },
        methods: {
            addCount() {
                this.count++;
                this.message = "update message"
            }
        }
    }).mount('#app5');
</script>
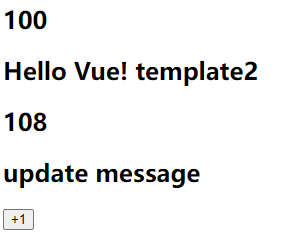
在 template 中使用 v-once 标记的 tag 只会在一开始计算、渲染,再之后不会更新渲染
v-once 标记的 tag 及其子 tag 都不会更新渲染,从上述代码上看就知道
v-text 指令
用于更新元素的 textContent
用 <h2 v-text="count"></h2> 和 <h2>{{ count }}</h2> 的表现和作用相同都是用来显示内容
<div id="app6"></div>
<template id="template6">
    <h2 v-text="count"></h2>
    <h2>{{ count }}</h2>
    <h2 v-text="message"></h2>
    <h2>{{ message }}</h2>
    <button @click="addCount">+1</button>
</template>
<script>
    Vue.createApp({
        template: '#template6',
        data() {
            return {
                message: 'Hello  Vue! template2',
                count: 100
            }
        },
        methods: {
            addCount() {
                this.count++;
                this.message = "<b>update message</b>"
            }
        }
    }).mount('#app6');
</script>
一般来说直接
{{}}就行了
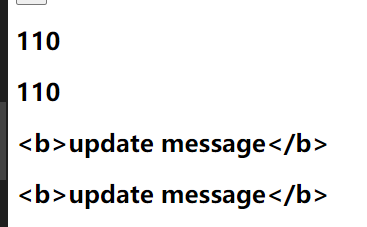
v-html 指令
默认情况下,如果展示的内容本身是 html 的, vue 并不会对其进行特殊的解析。如果希望这个内容被解析出来,可以使用 v-html
<div id="app7"></div>
<template id="template7">
    <h2 v-html="message"></h2>
    <h2>{{ message }}</h2>
    <button @click="addCount">+1</button>
</template>
<script>
    Vue.createApp({
        template: '#template7',
        data() {
            return {
                message: 'Hello  Vue! template2',
            }
        },
        methods: {
            addCount() {
                this.message = "<b>update message</b>"
            }
        }
    }).mount('#app7');
</script>

{{}}不会解析 html,所以会显示<b>;v-html会解析 html
v-pre 指令
v-pre 用于跳过元素和它的子元素的编译过程,显示原始的 Mustache 标签
一般用于跳过不需要编译的节点,加快编译的速度
<div id="app8"></div>
<template id="template8">
    <h2 v-pre>{{ message }}</h2>
    <h2>{{ message }}</h2>
    <button @click="addCount">+1</button>
</template>
<script>
    Vue.createApp({
        template: '#template8',
        data() {
            return {
                message: 'Hello  Vue! template2',
            }
        },
        methods: {
            addCount() {
                this.message = "<b>update message</b>"
            }
        }
    }).mount('#app8');
</script>
v-cloak
这个指令保持在元素上直到关联组件实例结束编译。和 CSS 规则如 [v-cloak]{ display: none } 一起用时,这个指令可以隐藏未编译的 Mustache 标签直到组件实例准备完毕
<style>
    [v-cloak] {
        display: none;
    }
</style>

<div id="app8"></div>
<template id="template8">
    <h2 v-cloak>{{ message }}</h2>
</template>
通过 CSS 设置,如果存在 v-cloak 则不会显示 h2 极其内容。当组件实例编译完毕之后,v-cloak 标签被删除,h2 内容就又会出现
Vue3 一般用不到
v-bind 绑定属性
除了内容需要动态决定外,某些属性也希望动态绑定,比如动态绑定 <a> 的 href 属性、动态绑定 <img> 元素的 src 属性
<div id="app1"></div>
<template id="template1">
    <a v-bind:href="href">{{message}}</a>
    <button @click="changeHref">+1</button>
</template>
<script>
    Vue.createApp({
        template: '#template1',
        data() {
            return {
                href: 'https://baidu.com',
                message: '打开百度',
            }
        },
        methods: {
            changeHref() {
                this.href = 'https://google.com';
                this.message = "打开谷歌";
            }
        }
    }).mount('#app1');
</script>
在需要使用 v-bind 的属性之前,添加 v-bind: 然后将属性值设置为 data 中的属性名即可
由于 v-bind 在开发中经常用到,为了提升编码效率,vue 提供了一个语法糖
<a :href="href">{{message}}</a>
没错,直接省略掉了 v-bind,只需要在对应的属性前加上 : 即可
v-bind 绑定 class
class 其实也是一种属性
通常来说 class 也是动态的,比如数据为真时文本为红色,否则为黑色
除了常规的 v-bind 的绑定方法之外,绑定 class 还有两种方法
- 对象语法
- 数组语法
什么是对象语法,如题所示,就是 class 属性绑定的其实是一个对象
<h2 :class="{'active':false, 'disabled': true}">{{ message }}</h2>
如上述代码所示,绑定了一个对象,其有两个属性:active 和 disabled,这就是 class 的值,通过 true、false 来决定是否需要启用这个 class
<!-- 对象语法 -->
<style>
.active {
color: red;
}
.disabled {
color: gray;
}
</style>
<div id="app2"></div>
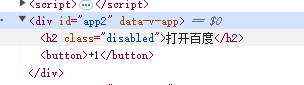
<template id="template2">
<h2 :class="{'active':isValid, 'disabled': !isValid}">{{ message }}</h2>
<button @click="changeHref">+1</button>
</template>
<script>
Vue.createApp({
template: '#template2',
data() {
return {
isValid: false,
message: '打开百度',
}
},
methods: {
changeHref() {
this.isValid = !this.isValid;
}
}
}).mount('#app2');
</script>
可以看到值为
false的class不会添加到标签上
通过下面这种写法,可以将确定的 class 和动态的 class 结合起来,前面没有 v-bind 就是确定需要的 class
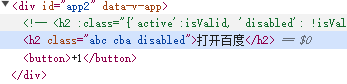
<h2 class="abc cba" :class="{'active':isValid, 'disabled': !isValid}">{{ message }}</h2>
除了将对象写在标签的属性上之外,还可以直接绑定 data 中的一个对象,或者 methods 中方法的返回值
<h2 class="abc cba" :class="classObj">{{ message }}</h2>
<h2 class="abc cba" :class="getClassObj()">{{ message }}</h2>

<script>
    Vue.createApp({
        template: '#template2',
        data() {
            return {
                message: '打开百度',
                classObj: {
                    active: true,
                    disabled: false
                }
            }
        },
        methods: {
            getClassObj() {
                return {
                    active: true,
                    disabled: false
                }
            }
        }
    }).mount('#app2');
</script>
什么是数组语法,如题所示,就是 class 属性绑定的其实是一个数组,这个数组中所有的 class 都会被添加
数组语法的用法跟对象语法类似,除此之外,数组语法的数组中还可以嵌套对象语法和三元运算
<div id="app3"></div>
<template id="template3">
    <h2 class="abc cba" :class="['active']">{{ message }}</h2>
    <h2 class="abc cba" :class="[isValid ? 'active' : 'disable']">{{ message }}</h2>
    <h2 class="abc cba" :class="['active', { disable: isValid }]">{{ message }}</h2>
    <h2 class="abc cba" :class="classes">{{ message }}</h2>
    <h2 class="abc cba" :class="getClasses()">{{ message }}</h2>
    <button @click="toDisable">+1</button>
</template>
<script>
    Vue.createApp({
        template: '#template3',
        data() {
            return {
                classes: ['active'],
                message: '打开百度',
                isValid: true
            }
        },
        methods: {
            getClasses() {
                return ['active'];
            },
            toDisable() {
                this.classes = ['disabled'];
            }
        }
    }).mount('#app3');
</script>